
# 1. 簡(jiǎn)單使用
可以直接結(jié)合`Toolbar`使用,也就是在添加的`item.xml`中直接使用,比如:
~~~
<?xml version="1.0" encoding="utf-8"?>
<menu xmlns:android="http://schemas.android.com/apk/res/android"
xmlns:app="http://schemas.android.com/apk/res-auto">
<item
android:id="@+id/bt2"
android:title="@string/note_page_description"
android:icon="@drawable/ic_baseline_search_24"
app:actionViewClass="android.widget.SearchView"
app:showAsAction="always" />
<item
android:id="@+id/bt3"
android:title="@string/note_page_setting"
android:icon="@drawable/ic_baseline_settings_24"
app:showAsAction="ifRoom"/>
</menu>
~~~
然后可以簡(jiǎn)單設(shè)置一下顯示格式。
參考:https://blog.csdn.net/jaynm/article/details/107172544
使用 `SearchView` 時(shí)可使用如下常用方法。
- `setIconifiedByDefault(Boolean iconified)`:設(shè)置該搜索框默認(rèn)是否自動(dòng)縮小為圖標(biāo)。
- `setSubmitButtonEnabled(Boolean enabled)`:設(shè)置是否顯示搜索按鈕。
- `setQueryHint(CharSequence hint)`:設(shè)置搜索框內(nèi)默認(rèn)顯示的提示文本。
- `setOnQueryTextListener(SearchView.OnQueryTextListener listener)`:為該搜索框設(shè)置事件監(jiān)聽器。
比如:
~~~
// 添加Toolbar菜單欄按鈕
override fun onCreateOptionsMenu(menu: Menu?): Boolean {
menuInflater.inflate(R.menu.toolbar_item, menu)
// 找到搜索框
val item = menu?.findItem(R.id.bt2)
search = item?.actionView as SearchView
// 設(shè)置搜索框
search.let {
it.isSubmitButtonEnabled = true
it.queryHint = "請(qǐng)輸入關(guān)鍵字"
it.imeOptions = EditorInfo.IME_ACTION_DONE
it.maxWidth = 800
}
return true
}
~~~
然后可以返回結(jié)果列表:
根據(jù)`setSuggestionsAdapter()`方法可以實(shí)現(xiàn)輸入搜索內(nèi)容,自動(dòng)提示的功能。`setSuggestionsAdapter(CursorAdapter adapter)`方法需要一個(gè) `CursorAdapter` 參數(shù),這里看到` Cursor`,很多人就應(yīng)該清楚,`Cursor` 光標(biāo)或者游標(biāo)。正常情況下這里應(yīng)該采用 `Cursor` 操作數(shù)據(jù)庫(kù),可以實(shí)現(xiàn)查詢篩選功能。
# 2. 搜索提示功能
一般開發(fā)中遇到的需求是:輸入關(guān)鍵字就顯示搜索結(jié)果,所以需要監(jiān)聽搜索框的文字輸入,一旦文字變化就查詢數(shù)據(jù)庫(kù),更新搜索結(jié)果。這里為了模擬,創(chuàng)建一個(gè)數(shù)據(jù)庫(kù)。這里使用`Room`框架來構(gòu)建,也就是三步:
- 創(chuàng)建表對(duì)應(yīng)的實(shí)體類;
- 創(chuàng)建`Dao`層操作接口類;
- 創(chuàng)建繼承自`RoomDatabase`的數(shù)據(jù)庫(kù)`Dao`層接口獲取類;
至于更多`Room`操作細(xì)節(jié),可以查看我的看云的`Kotlin`筆記處。這里不再給出。當(dāng)然,對(duì)應(yīng)于這里我們需要模糊查詢,這里給出一個(gè)示例:
~~~
@Query("select * from MFNote where (title like '%' || :words || '%') or (content like '%' || :words || '%') or (first_submit like '%' || :words || '%') or (last_modify like '%' || :words || '%') or (label like '%' || :words || '%') or (category like '%' || :words || '%') LIMIT 10")
fun getNodesByKeyWords(words: String): Cursor
~~~
這里沒有指定具體類型`List<MFNote>`,因?yàn)槲覀冞@里需要一個(gè)`Cursor`對(duì)象。然后為查詢后顯示的`item`創(chuàng)建布局文件(`search_item_layout.xml`):
~~~
<?xml version="1.0" encoding="utf-8"?>
<LinearLayout xmlns:android="http://schemas.android.com/apk/res/android"
xmlns:tools="http://schemas.android.com/tools"
android:orientation="vertical"
android:layout_width="match_parent"
android:background="@color/white"
android:layout_height="match_parent"
>
<TextView
android:id="@+id/search_item_tv"
android:layout_width="match_parent"
android:layout_height="wrap_content"
android:textSize="18sp"
android:text="主標(biāo)題"
android:textStyle="bold"
android:padding="10dp"
android:textColor="@color/black"
android:gravity="center_vertical|start"
>
</TextView>
<TextView
android:id="@+id/search_item_subTitle"
android:layout_width="match_parent"
android:layout_height="wrap_content"
android:textSize="12sp"
android:text="副標(biāo)題"
android:paddingStart="10dp"
android:paddingBottom="10dp"
android:paddingEnd="10dp"
android:maxEms="20"
android:singleLine="true"
android:ellipsize="end"
android:textColor="@color/gray"
android:gravity="center_vertical|start"
tools:ignore="RtlSymmetry">
</TextView>
</LinearLayout>
~~~
然后找到這個(gè)`SearchView`,進(jìn)行設(shè)置:
~~~
// 添加Toolbar菜單欄按鈕
override fun onCreateOptionsMenu(menu: Menu?): Boolean {
menuInflater.inflate(R.menu.toolbar_item, menu)
// 找到搜索框
val item = menu?.findItem(R.id.bt2)
search = item?.actionView as SearchView
// 設(shè)置搜索框
search.let {
it.isSubmitButtonEnabled = true
it.queryHint = "請(qǐng)輸入關(guān)鍵字"
it.imeOptions = EditorInfo.IME_ACTION_DONE
it.maxWidth = 800
}
// 設(shè)置輸入監(jiān)聽函數(shù)
search.setOnQueryTextListener(object : SearchView.OnQueryTextListener {
override fun onQueryTextSubmit(query: String?): Boolean {
return false
}
override fun onQueryTextChange(newText: String?): Boolean {
if(mfDao == null){
mfDao = MFNoteDataBase.getInstance(this@MainActivity)?.mfDao()
}
val cursor = mfDao?.getNodesByKeyWords(newText?:"測(cè)")
Log.e("TAG", "onQueryTextChange: ${newText}, cursor count : ${cursor?.count}" )
if(search.suggestionsAdapter == null){
val cursorAdapter = SimpleCursorAdapter(this@MainActivity,
R.layout.search_item_layout, cursor,
listOf<String>("title", "content").toTypedArray(), listOf<Int>(R.id.search_item_tv, R.id.search_item_subTitle).toIntArray()
) as CursorAdapter
search.suggestionsAdapter = cursorAdapter
} else{
search.suggestionsAdapter.changeCursor(cursor)
}
return false
}
})
return true
}
~~~
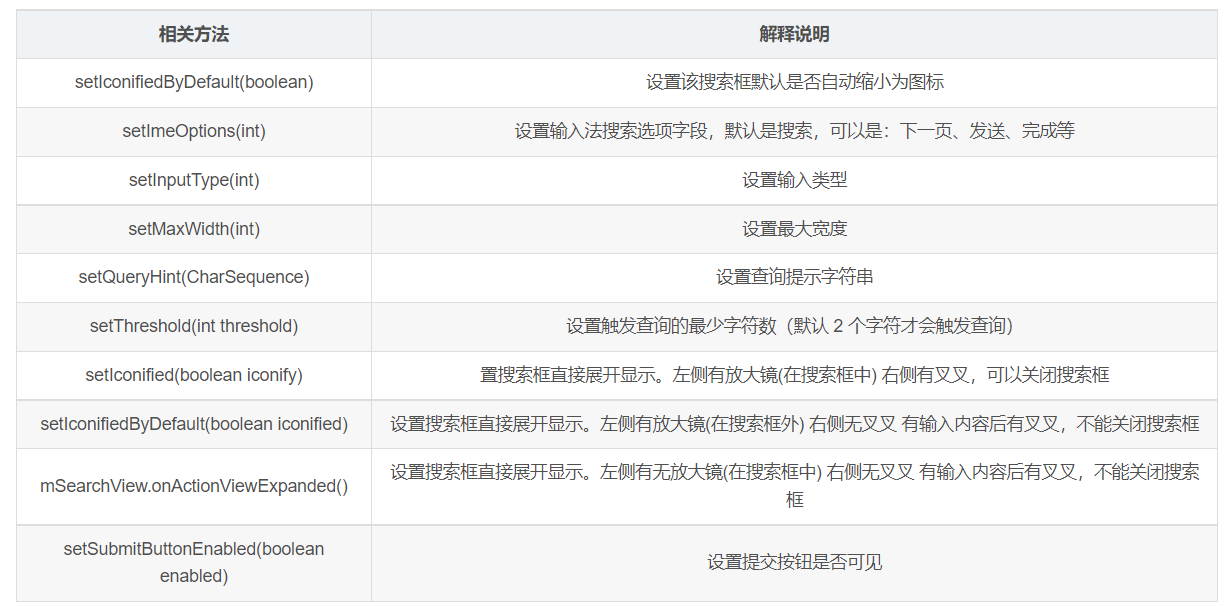
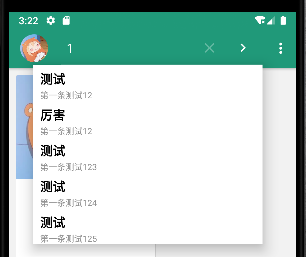
效果:
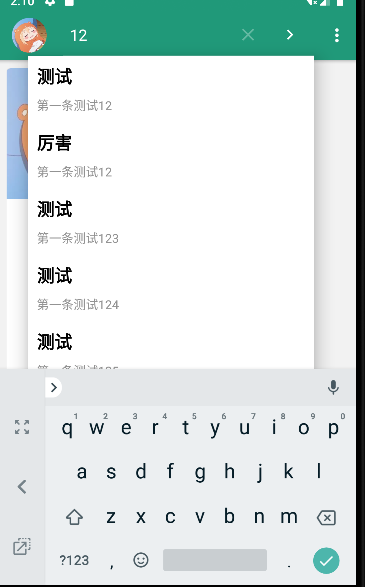
但是有個(gè)弊端就是需要輸入兩個(gè)字符才會(huì)有數(shù)據(jù)提示。這里通過反射來實(shí)現(xiàn):
~~~
// 通過反射設(shè)置只要有一個(gè)文字就觸發(fā)查詢
val clazz = search.javaClass
val field =
clazz.getDeclaredField("mSearchSrcTextView")
field.isAccessible = true
val searchAutoComplete = field.get(search) as AutoCompleteTextView
searchAutoComplete.threshold = 1
~~~
效果:
當(dāng)然,也可以直接不使用默認(rèn)的這個(gè)結(jié)果顯示,自己寫一個(gè)`ListView`,然后進(jìn)行監(jiān)聽`SearchView`的數(shù)據(jù)變化,自己來渲染在`xml`中寫入的`ListView`即可。這里不采用這種方式,所以這里不再給出案例。
# 3. 搜索提示監(jiān)聽
當(dāng)然,上面的功能還沒完,我們還需要響應(yīng)點(diǎn)擊事件。這里就需要查閱官方文檔:[創(chuàng)建搜索界面 ?|? Android 開發(fā)者 ?|? Android Developers](https://developer.android.com/guide/topics/search/search-dialog)
## 3.1 配置xml文件
首先需要的是一個(gè)名為可搜索配置的 `XML `文件。名為`searchable.xml`,并且必須保存在`res/xml/`項(xiàng)目目錄中。
> 注意:系統(tǒng)使用此文件來實(shí)例化`[SearchableInfo](https://developer.android.com/reference/android/app/SearchableInfo)`對(duì)象,但您無法在運(yùn)行時(shí)自行創(chuàng)建此對(duì)象,您必須在 `XML` 中聲明可搜索配置。比如:
~~~
<?xml version="1.0" encoding="utf-8"?>
<searchable xmlns:android="http://schemas.android.com/apk/res/android"
android:hint="@string/search"
android:label="@string/title">
</searchable>
~~~
## 3.2 創(chuàng)建可搜索 Activity
因?yàn)檫@里我只是在`MainActivity`中有搜索框`SearchView`,所以這里我也只能配置在`MainActivity`來接受結(jié)果。比如:
~~~
<activity android:name=".MainActivity">
<intent-filter>
<action android:name="android.intent.action.MAIN" />
<category android:name="android.intent.category.LAUNCHER" />
</intent-filter>
<intent-filter>
<action android:name="android.intent.action.SEARCH" />
</intent-filter>
<meta-data
android:name="android.app.searchable"
android:resource="@xml/searchable" />
</activity>
~~~
1. 在[`<intent-filter>`](https://developer.android.com/guide/topics/manifest/intent-filter-element)元素中聲明要接受[`ACTION_SEARCH`](https://developer.android.com/reference/android/content/Intent#ACTION_SEARCH)`intent` 的 `Activity`。
2. 在[`<meta-data>`](https://developer.android.com/guide/topics/manifest/meta-data-element)元素中指定要使用的可搜索配置。
## 3.3 配置關(guān)聯(lián)
需要為每個(gè)[`SearchView`](https://developer.android.com/reference/android/widget/SearchView)啟用輔助搜索。為此,您可以調(diào)用[`setSearchableInfo()`](https://developer.android.com/reference/android/widget/SearchView#setSearchableInfo(android.app.SearchableInfo))并向其傳遞表示可搜索配置的[`SearchableInfo`](https://developer.android.com/reference/android/app/SearchableInfo)對(duì)象。
~~~
// 響應(yīng)搜索列表點(diǎn)擊
val searchManager = getSystemService(Context.SEARCH_SERVICE) as SearchManager
search.apply {
setSearchableInfo(searchManager.getSearchableInfo(componentName))
}
~~~
## 3.4 顯示搜索結(jié)果
在可搜索 `Activity` 中執(zhí)行搜索涉及三個(gè)步驟:
1. [接收查詢](https://developer.android.com/guide/topics/search/search-dialog#ReceivingTheQuery)
2. [搜索數(shù)據(jù)](https://developer.android.com/guide/topics/search/search-dialog#SearchingYourData)
3. [顯示結(jié)果](https://developer.android.com/guide/topics/search/search-dialog#PresentingTheResults)
比如下面的代碼:
~~~
override fun onCreate(savedInstanceState: Bundle?) {
? ? ? ? super.onCreate(savedInstanceState)
? ? ? ? setContentView(R.layout.search)
? ? ? ? // Verify the action and get the query
? ? ? ? if (Intent.ACTION_SEARCH == intent.action) {
? ? ? ? ? ? intent.getStringExtra(SearchManager.QUERY)?.also { query ->
? ? ? ? ? ? ? ? doMySearch(query)
? ? ? ? ? ? }
? ? ? ? }
? ? }
~~~
更多細(xì)節(jié)可以查閱官方文檔:[設(shè)置搜索界面 ?|? Android 開發(fā)者 ?|? Android Developers](https://developer.android.com/training/search/setup)
因?yàn)檫@里所有的控件都是在`MainActivity`中,所以這里需要代碼設(shè)置部分顯示和部分不顯示。而且我們需要設(shè)置這個(gè)`Activity`的啟動(dòng)模式:
```
android:launchMode="singleTop"
```
然后,在[`onNewIntent()`](https://developer.android.com/reference/android/app/Activity#onNewIntent(android.content.Intent))方法中處理[`ACTION_SEARCH`](https://developer.android.com/reference/android/content/Intent#ACTION_SEARCH)`intent`。
比如:
~~~
override fun onNewIntent(intent: Intent?) {
super.onNewIntent(intent)
processSearchData(intent)
}
fun processSearchData(intent: Intent?){
if(intent?.action == Intent.ACTION_SEARCH){
val stringExtra = intent.extras?.get(SearchManager.QUERY)
Log.e("TAG", "processSearchData: ${ stringExtra }" )
}
}
~~~
但是呢,很不幸,結(jié)果如下:

這里并沒有獲取到任何數(shù)據(jù),所以這里需要再次查閱其源碼:
~~~
private Intent createIntentFromSuggestion(Cursor c, int actionKey, String actionMsg) {
try {
// use specific action if supplied, or default action if supplied, or fixed default
String action = getColumnString(c, SearchManager.SUGGEST_COLUMN_INTENT_ACTION);
if (action == null) {
action = mSearchable.getSuggestIntentAction();
}
if (action == null) {
action = Intent.ACTION_SEARCH;
}
// use specific data if supplied, or default data if supplied
String data = getColumnString(c, SearchManager.SUGGEST_COLUMN_INTENT_DATA);
if (data == null) {
data = mSearchable.getSuggestIntentData();
}
// then, if an ID was provided, append it.
if (data != null) {
String id = getColumnString(c, SearchManager.SUGGEST_COLUMN_INTENT_DATA_ID);
if (id != null) {
data = data + "/" + Uri.encode(id);
}
}
Uri dataUri = (data == null) ? null : Uri.parse(data);
String query = getColumnString(c, SearchManager.SUGGEST_COLUMN_QUERY);
String extraData = getColumnString(c, SearchManager.SUGGEST_COLUMN_INTENT_EXTRA_DATA);
return createIntent(action, dataUri, extraData, query, actionKey, actionMsg);
} catch (RuntimeException e ) {
int rowNum;
try { // be really paranoid now
rowNum = c.getPosition();
} catch (RuntimeException e2 ) {
rowNum = -1;
}
Log.w(LOG_TAG, "Search suggestions cursor at row " + rowNum +
" returned exception.", e);
return null;
}
}
~~~
以及:
~~~
private Intent createIntent(String action, Uri data, String extraData, String query,
int actionKey, String actionMsg) {
// Now build the Intent
Intent intent = new Intent(action);
intent.addFlags(Intent.FLAG_ACTIVITY_NEW_TASK);
// We need CLEAR_TOP to avoid reusing an old task that has other activities
// on top of the one we want. We don't want to do this in in-app search though,
// as it can be destructive to the activity stack.
if (data != null) {
intent.setData(data);
}
intent.putExtra(SearchManager.USER_QUERY, mUserQuery);
if (query != null) {
intent.putExtra(SearchManager.QUERY, query);
}
if (extraData != null) {
intent.putExtra(SearchManager.EXTRA_DATA_KEY, extraData);
}
if (mAppSearchData != null) {
intent.putExtra(SearchManager.APP_DATA, mAppSearchData);
}
if (actionKey != KeyEvent.KEYCODE_UNKNOWN) {
intent.putExtra(SearchManager.ACTION_KEY, actionKey);
intent.putExtra(SearchManager.ACTION_MSG, actionMsg);
}
intent.setComponent(mSearchable.getSearchActivity());
return intent;
}
~~~
根據(jù)上面源碼可以很容易知道放置進(jìn)去的鍵值對(duì),故而這里可以多測(cè)試幾組:
~~~
fun processSearchData(intent: Intent?){
if(intent?.action == Intent.ACTION_SEARCH){
Log.e("TAG", "QUERY: ${ intent.extras?.get(SearchManager.QUERY) }" )
Log.e("TAG", "USER_QUERY: ${ intent.extras?.get(SearchManager.USER_QUERY) }" )
Log.e("TAG", "EXTRA_DATA_KEY: ${ intent.extras?.get(SearchManager.EXTRA_DATA_KEY) }" )
Log.e("TAG", "ACTION_KEY: ${ intent.extras?.get(SearchManager.ACTION_KEY) }" )
Log.e("TAG", "ACTION_MSG: ${ intent.extras?.get(SearchManager.ACTION_MSG) }" )
}
}
~~~
輸入:
然后隨機(jī)點(diǎn)擊一個(gè):
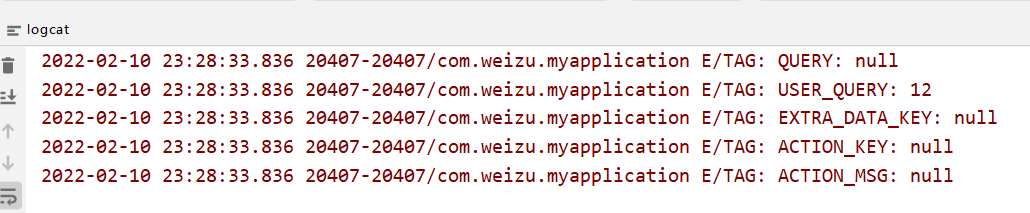
可以看見此時(shí)有效的只有`USER_QUERY`。故而這里還需要看源碼,看看如何設(shè)置。可以看見:
~~~
// Cursor c
String query = getColumnString(c, SearchManager.SUGGEST_COLUMN_QUERY);
~~~
而這個(gè)方法來自:
~~~
import static android.widget.SuggestionsAdapter.getColumnString;
~~~
其方法細(xì)節(jié)為:
~~~
public static String getColumnString(Cursor cursor, String columnName) {
int col = cursor.getColumnIndex(columnName);
return getStringOrNull(cursor, col);
}
~~~
也就是從`cursor`中獲取指定名字的列的數(shù)據(jù)。所以我們只需要確保查詢到的數(shù)據(jù)中有`SearchManager.SUGGEST_COLUMN_QUERY`這么一列。而這個(gè)值為:
~~~
public final static String SUGGEST_COLUMN_QUERY = "suggest_intent_query";
~~~
這里由于我使用的是`Room`所以這里我直接在`Entity`類中添加一個(gè)屬性:
~~~
@ColumnInfo(name = "suggest_intent_query")
var query: Int = 0
~~~
然后重新生成數(shù)據(jù)庫(kù)即可。然后添加兩天數(shù)據(jù),再次測(cè)試:
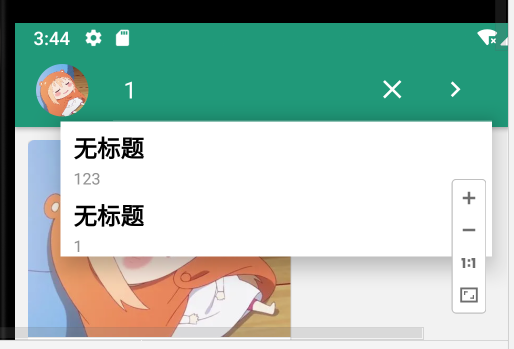
再次隨機(jī)點(diǎn)擊一條,查看控制臺(tái)打印信息:

可以看到此時(shí)對(duì)應(yīng)的`QUERY`字段就有值了。由于我們可能需要通過這個(gè)字段來查詢數(shù)據(jù),進(jìn)而顯示詳細(xì)的數(shù)據(jù),所以這里需要其每個(gè)記錄的唯一,所以后面可能需要修改為`Long`,來存儲(chǔ)毫秒數(shù)。
# 3.5 重新修改邏輯
如果均在`MainActivity`顯示主要內(nèi)容,以及顯示搜索結(jié)果,那么就需要設(shè)置很多的顯示和隱藏,比如:
~~~
// 進(jìn)入顯示搜索結(jié)果的時(shí)候
fun enterSearchResultView(search_result_ll: LinearLayout){
search_result_ll.visibility = View.VISIBLE
swiperefreshLayout.visibility = View.GONE
bottom_tab.visibility = View.GONE
floatingactionbutton.visibility = View.GONE
}
~~~
但是,感覺這樣太麻煩了,所以這里我預(yù)期將搜索結(jié)果顯示放置在另外一個(gè)`Activity`中。首先修改一下清單文件:
~~~
<activity android:name=".MainActivity"
android:launchMode="singleTop">
<intent-filter>
<action android:name="android.intent.action.MAIN" />
<category android:name="android.intent.category.LAUNCHER" />
</intent-filter>
</activity>
<activity android:name=".activitys.TestActivity">
<intent-filter>
<action android:name="android.intent.action.SEARCH" />
</intent-filter>
<meta-data
android:name="android.app.searchable"
android:resource="@xml/searchable" />
</activity>
~~~
然后,需要關(guān)聯(lián)對(duì)應(yīng)的`TestActivity`文件:
~~~
// 響應(yīng)搜索列表點(diǎn)擊
val searchManager = getSystemService(Context.SEARCH_SERVICE) as SearchManager
search.apply {
setSearchableInfo(searchManager.getSearchableInfo(componentName))
}
~~~
但是,`componentName`是在當(dāng)前`Activity`的`this`中獲取到的,這里我無法直接獲取到`TestActivity`的`componentName`,所以直接手動(dòng)創(chuàng)建一個(gè)對(duì)應(yīng)的對(duì)象。
~~~
// 響應(yīng)搜索列表點(diǎn)擊
val searchManager = getSystemService(Context.SEARCH_SERVICE) as SearchManager
search.apply {
val search_componentName = ComponentName("com.weizu.myapplication.activitys", "com.weizu.myapplication.activitys.TestActivity")
setSearchableInfo(searchManager.getSearchableInfo(search_componentName))
}
~~~
但是這里失敗了:

這里也就懶得繼續(xù)看源碼來看如何解決了。這里就不修改了!??!直接修改邏輯為查詢到數(shù)據(jù),就跳轉(zhuǎn)到一個(gè)新的`Activity`:
~~~
fun processSearchData(intent: Intent?){
if(intent?.action == Intent.ACTION_SEARCH){
// 用戶點(diǎn)擊的數(shù)據(jù)在數(shù)據(jù)庫(kù)表MFNote對(duì)應(yīng)的suggest_intent_query的值
val suggest_intent_query = intent.getStringExtra(SearchManager.QUERY)
Log.e("TAG", "QUERY: ${suggest_intent_query}")
// 直接跳轉(zhuǎn)到顯示Activity
startActivity(Intent().setClass(this, TestActivity::class.java))
}
}
~~~
# 3.6 清除搜索框文本
~~~
fun processSearchData(intent: Intent?){
if(intent?.action == Intent.ACTION_SEARCH){
// 用戶點(diǎn)擊的數(shù)據(jù)在數(shù)據(jù)庫(kù)表MFNote對(duì)應(yīng)的suggest_intent_query的值
val suggest_intent_query = intent.getStringExtra(SearchManager.QUERY)
// 直接跳轉(zhuǎn)到顯示Activity
if(!TextUtils.isEmpty(suggest_intent_query)){
// 清除搜索框文本,關(guān)閉鍵盤,關(guān)閉搜索框
searchAutoComplete?.setText("")
searchAutoComplete?.clearFocus()
val clazz = search.javaClass
val declaredMethod = clazz.getDeclaredMethod("onCloseClicked")
declaredMethod.setAccessible(true);
declaredMethod.invoke(search)
val searchResultsIntent = Intent()
searchResultsIntent.apply {
setClass(this@MainActivity, TestActivity::class.java)
putExtra("suggest_intent_query", suggest_intent_query)
}
startActivity(searchResultsIntent)
}
}
}
~~~
至于`searchAutoComplete`來自反射:
~~~
// 通過反射設(shè)置只要有一個(gè)文字就觸發(fā)查詢
val clazz = search.javaClass
val field =
clazz.getDeclaredField("mSearchSrcTextView")
field.isAccessible = true
if(searchAutoComplete == null){
searchAutoComplete = field.get(search) as AutoCompleteTextView
}
searchAutoComplete?.threshold = 1
~~~
結(jié)果就可以做到返回后關(guān)閉鍵盤,清空搜索框,關(guān)閉搜索框。
- 介紹
- UI
- MaterialButton
- MaterialButtonToggleGroup
- 字體相關(guān)設(shè)置
- Material Design
- Toolbar
- 下拉刷新
- 可折疊式標(biāo)題欄
- 懸浮按鈕
- 滑動(dòng)菜單DrawerLayout
- NavigationView
- 可交互提示
- CoordinatorLayout
- 卡片式布局
- 搜索框SearchView
- 自定義View
- 簡(jiǎn)單封裝單選
- RecyclerView
- xml設(shè)置點(diǎn)擊樣式
- adb
- 連接真機(jī)
- 小技巧
- 通過字符串ID獲取資源
- 自定義View組件
- 使用系統(tǒng)控件重新組合
- 旋轉(zhuǎn)菜單
- 輪播圖
- 下拉輸入框
- 自定義VIew
- 圖片組合的開關(guān)按鈕
- 自定義ViewPager
- 聯(lián)系人快速索引案例
- 使用ListView定義側(cè)滑菜單
- 下拉粘黏效果
- 滑動(dòng)沖突
- 滑動(dòng)沖突之非同向沖突
- onMeasure
- 繪制字體
- 設(shè)置畫筆Paint
- 貝賽爾曲線
- Invalidate和PostInvalidate
- super.onTouchEvent(event)?
- setShadowLayer與陰影效果
- Shader
- ImageView的scaleType屬性
- 漸變
- LinearGradient
- 圖像混合模式
- PorterDuffXfermode
- 橡皮擦效果
- Matrix
- 離屏繪制
- Canvas和圖層
- Canvas簡(jiǎn)介
- Canvas中常用操作總結(jié)
- Shape
- 圓角屬性
- Android常見動(dòng)畫
- Android動(dòng)畫簡(jiǎn)介
- View動(dòng)畫
- 自定義View動(dòng)畫
- View動(dòng)畫的特殊使用場(chǎng)景
- LayoutAnimation
- Activity的切換轉(zhuǎn)場(chǎng)效果
- 屬性動(dòng)畫
- 幀動(dòng)畫
- 屬性動(dòng)畫監(jiān)聽
- 插值器和估值器
- 工具
- dp和px的轉(zhuǎn)換
- 獲取屏幕寬高
- JNI
- javah命令
- C和Java相互調(diào)用
- WebView
- Android Studio快捷鍵
- Bitmap和Drawable圖像
- Bitmap簡(jiǎn)要介紹
- 圖片縮放和裁剪效果
- 創(chuàng)建指定顏色的Bitmap圖像
- Gradle本地倉(cāng)庫(kù)
- Gradle小技巧
- RxJava+Okhttp+Retrofit構(gòu)建網(wǎng)絡(luò)模塊
- 服務(wù)器相關(guān)配置
- node環(huán)境配置
- 3D特效